
Skip to product grid
-
-$100.00 AUD

 Vendor:SXTH Element
"GR" Dimmable LED Wall Sign
Regular price $177.00 AUDRegular price$277.00 AUD-$100.00 AUD Sale price $177.00 AUD -

 Vendor:SXTH Element
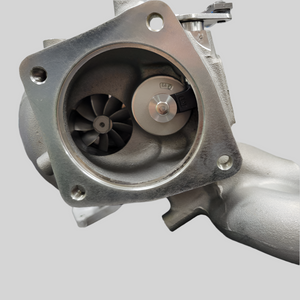
"N" 2.0T S-500 Ball Bearing Turbocharger
Regular price $4,105.00 AUDRegular price -
Vendor:SXTH Element
"N" 2.0T S-500 Ball Bearing Turbocharger Conversion Service
Regular price $2,922.00 AUDRegular price -

 Vendor:SXTH Element
"N" Dimmable LED Wall Sign
Regular price From $214.00 AUDRegular price -

 Vendor:SXTH Element
1.6T & 3.3T AV6 Blow Off Valve
Regular price $308.00 AUDRegular price -
 Vendor:SXTH Element
1.6T Intercooler Resonator Delete
Regular price $48.00 AUDRegular price -
Sold out

 Vendor:SXTH Element
1.6T SmartStream S-300 Hybrid Turbocharger Upgrade
Regular price $1,578.00 AUDRegular price$2,994.00 AUD-$1,416.00 AUD Sale price $1,578.00 AUD -

 Vendor:SXTH Element
2.0T AV6 Blow Off Valve
Regular price $308.00 AUDRegular price -

 Vendor:SXTH Element
2.5T K5 GT & Sonata N-Line CPLT Intake
Regular price $631.00 AUDRegular price -

 Vendor:SXTH Element
2.5T Turbo Inlet Pipe (V2.0)
Regular price $315.00 AUDRegular price -
 Vendor:SXTH Element
2.5T/1.6T Smartstream AV6 Blow Off Valve
Regular price $308.00 AUDRegular price -
Sold out
 Vendor:SXTH Element
2024+ Tacoma Bed Step Relocation Bracket
Regular price $119.00 AUDRegular price -

 Vendor:SXTH Element
2024+ Tacoma Front Bed MOLLE Panel Kit
Regular price $441.00 AUDRegular price -

 Vendor:SXTH Element
2024+ Toyota Tacoma & 4Runner Front Recovery Points
Regular price $362.00 AUDRegular price -

 Vendor:SXTH Element
2024+ Toyota Tacoma CPLT Intake
Regular price $631.00 AUDRegular price -
-$61.00 AUD

 Vendor:SXTH Element
2024+ Toyota Tacoma Ditch Light Mounting Brackets
Regular price $64.00 AUDRegular price$125.00 AUD-$61.00 AUD Sale price $64.00 AUD


